Pages

Showing posts with label Home Decour. Show all posts

Monday, September 3, 2012

I'll Take It!

Believe it or not, I had never been to an auction before! Talk about a deprived childhood. I mean, I frequent garage or estate sales and Craigslist Curb Alerts, scouring for the next best thing to upscale, but auctioning opened my eyes to a whole new world of bargaining.

Friday night, we attended the Pilsen Packrat Auction in Lincolnville, Kansas. Then Saturday morning and afternoon were spent at a local estate auction in Hillsboro.  I feel like we really hit the jackpot here! 

Between the two of us, my husband and I spent 17 dollars for the whole weekend of thrifty finds.
Here's what we returned with:

We intend to sell the Life game- pieces are still in packages!


To the average eye, this may look like a pile of junk, but to us it is a pile of tresures awaiting their transformation!

I think I saw on Pinterest these crates being used as adorable shelving!

A couple of these bottles are valuable; the rest will be put to use for my decorating :)
 At one point the auctioneer dropped his asking bid from ten dollars to just a dollar. Finally, when no one would bid for the old porch swing, I blurted, "I'll take it!" It sort of caugh the auctioneer off guard as he responded, "It's yours, Miss 'I'll take it!'" Of course, I didn't consider the inconvenience of hauling off a ginormous wooden porch swing.

My studly husband :) Putting his muscles to good use!

Some of these things (but not very many) I intend to resell via Ebay. But MOST of it, I plan on utilizing in our home, whenever we officially have one. I'll have to post about all the remodeling adventures I have with this bunch! At least it gives me something to put my heart into while I don't have a house to decorate. Or clean. Hahah

Wednesday, August 15, 2012

Happy Birthday Mommmmmmmmm!

Phew! The secret is out! I had to wait until my Mom's birthday to make this post because the it contains a tutorial (kind of) of her gift! I made her living room pillows to match her living room rug!Here's the rug and room I attempted to match:


So, I copied this tutorial almost exactly: DIY DISH
Fabric Measurements for 16" pillow are as follows:
Front- 1 6x17" strip, 1 2x17" strip, and 1 9x17" strip.
Back- 17x17" square of coordinating fabric. 
This is a photo of the strips sewn together and the pillow sides turned inside out, ready to be sewn.

For the flowers, I utilized felt and simply followed the tutorial on the DIY DISH, using different colors, of course.


The result:
Unstuffed pillows!
 Hope she likes them!


Wednesday, July 4, 2012

REMODELING SERIES: THE NURSERY

It is funny looking back at this, becuase we had no idea we were going to have a baby. And we decided (probably by the goodness of God) to make this house a two-bedroom by inserting a dividing wall (which I already talking about in my post about the living room).

Now that we have little 4-month-old Rylan, we couldn't be happier that we have a room to put him in! Here's another funny part-- we painted it this bright blue before we even knew we were expecting! And he's a boy! Oh, the irony.

So anyways, since I'm crunched for time before the next remodel we are doing (beginning July 18!) I am going to take the lazy route and utilize a previous post I made about cute babies' rooms.

Here's the link:

It was so much fun getting to make the bedding with my mother-in-law, and now seeing it in use by my little man is even better! 

Stay tuned for only two more posts on the remodel in this house, one on our bedroom and the bathrooms! 
Thanks!


Sunday, May 27, 2012

DIY Spring Wreath

I know it's summer, but I started this project in the spring (that just goes to show how little time I've had to craft lately), so I'm calling it a spring wreath, even though it's versatile enough to carry through the summer :)

Looks like a great start to an afternoon of crafting- Doritos and Oreos and milk :)
Start with some of your favorite coordinating colors of yarn, felt, and buttons. Also have a styrofoam wreath handy! Decide on your main color and wrap the yarn around the wreath alternating colors to your liking.
 I periodically dot the wreath with hot glue to make sure to yarn stays where I wrap it. After it's wrapped to completion, you can set that aside for a while as you'll be working on the decorative felt flowers. I used several colors and several different types of flowers, and you could get away with any variety of them.
The first I used was a basic hippie flower. Cut one length of your felt sheet like this:


The number of "humps" you have will depend on their size and shape. You could make each petal pointy, or more oval shape, depending on personal preference. Then you'll take your sewing needle through the bottom if the petals with just a basic weave stitch.Once you've made it all the way through, connect the ends and secure with a knot, as shown to the right.


The second type of flower that I made was a "scalloped" flower.

Here's a link to a great tutorial that explains it much better than I could:

Scalloped Felt Flowers

I would have done several more types of flowers, but I lost motivation. But if you search "felt flowers" on Pinterest, you will see a bunch of other options-- some of them are so cute!


Once I had everything gathered together....

I arranged the details in a pleasing manner around the wreath, securing with hot glue. I added buttons and green felt leaves where I thought it was lacking. A good tip: Cover up any imperfections in your wreath with the flowers! This worked well for me :)

The final product, hung and all:


Sadly, this will be my last crafting post for a while. Since my life is in boxes, it is very difficult to find the time to get everything together to craft. But I have great things in mind! And plus, then I will also have some (hopefully) great posts about a NEW home to remodel :)

Thanks for viewing!


Thursday, April 26, 2012

DIY Scrapbook Paper Wallflowers

As Rylan and I have figured out more of a daily schedule, I've had a little more time to get crafting and scrapbooking. The morning goes one of two ways: I either can't fully wake up and go right back to sleep after he eats, OR I get motivated by how messy my house is. On those lucky motivated days, I usually have some time to myself in the late afternoon that I spend scrapbooking (I have done about 6 pages of Rylan's baby book!) and the occasional craft.
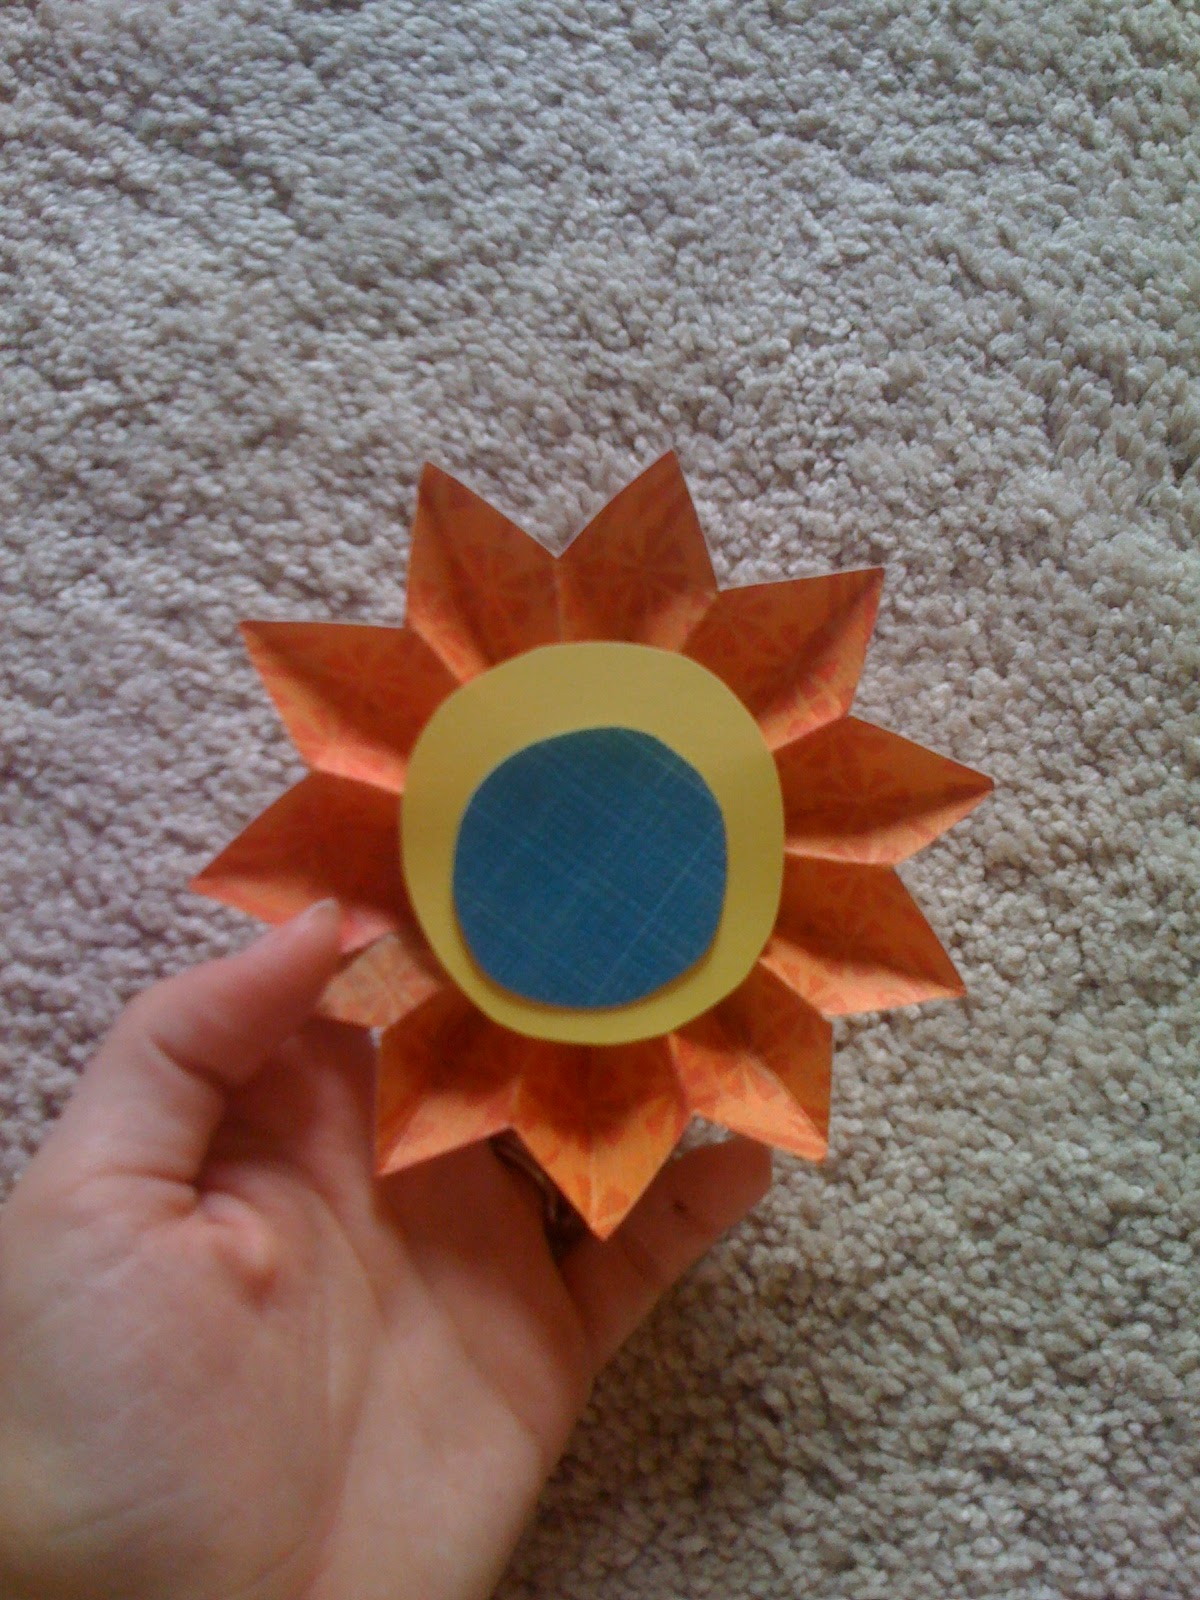
This project took me a few days last week to complete. It started out really frustrating for me, but I like the way it has turned out! These scrapbook paper wallflowers were the perfect springtime addition to our dining room!

1. Choose! To make these flowers, pick out some of your scrapbook paper in several different coordinating patterns. Decide beforehand which ones you want to use for the center of the flowers, the petals, and other accents.

2. Cut! In order to form the petals, your scrapbook paper needs to be at east 20" long (the longer the easier- trust me!), but mine wasn't, so I had to use tacky glue to adhere two pieces together. The widths of the paper will vary depending on the size you want your flowers, anywhere from 2.75" to 5 or 6." In the picture above, the small orange flower is the 2.75" width and the large polka dot flower is has a 5.5" width, with the others varying in between.

 Left: Score the edge of one length in whatever fashion you want: the small orange flower is demonstrated below, a basic repeated triangular score. Other types include a more jagged, thin triangular score, small slits, or even wavy lines (as seen on the blue/green flower in the large picture above).


3. Fold! Accordion fold the paper in relation to the score- marks on the edges, as seen to the right. I made the mistake with this flower (my first) of making the folds too large, so smaller folds, though more difficult, will also be more beneficial. Be sure that your folds remain aligned with one another.


4. Bond! Glue the edges of the folded paper together to form a tube. When the glue is secure and dry, gently push down on the un-scored edge of the tube until it flattens. Mine were never able to fully flatten, so gluing the back was difficult- I used hot glue for this part since it hardens quickly and holds paper well. Then I simply cut out two circles of coordinating paper for the center. You can use other items to be creative as well: buttons, fabric, beads, pearls, bling, anything!

5. Repeat! Use an appealing variety of colors, patterns, solids and shapes!

6. Show off! Hang your masterpiece somewhere it'll POP! To connect them, I used hot glue and balsa wood to create a stable foundation for all the flowers. To hang them, I (shamefully) used tape! But it worked, so I guess I'll just call it "using my immediate resources" instead of "being straightup tacky."


Hope you enjoy this project as much as I did!

Saturday, March 31, 2012

EASY DIY Book Display

This is probably the easiest DIY ever posted and it can make a huge difference in the way a room looks! Ok, so I love books. I think have over a billion. But I have no where to put them because I have always though displaying them can be so tacky (unless you are one of those amazing people who can strategically arrange them by color gradient or possibly by height- you are a Real Man of Genius!) I am no good at arranging things and I love matchy-matchy things............ so I can't believe I didn't think of this sooner!!!!!!

OK! Is it lame that I am THIS excited to share this? This was my book display before my breakthrough. Meh, nothing to write home about. Lame attempt at color coordination if you ask me.


BUT! Then I saw this idea in a Better Homes and Gardens magazine, which I read religiously.

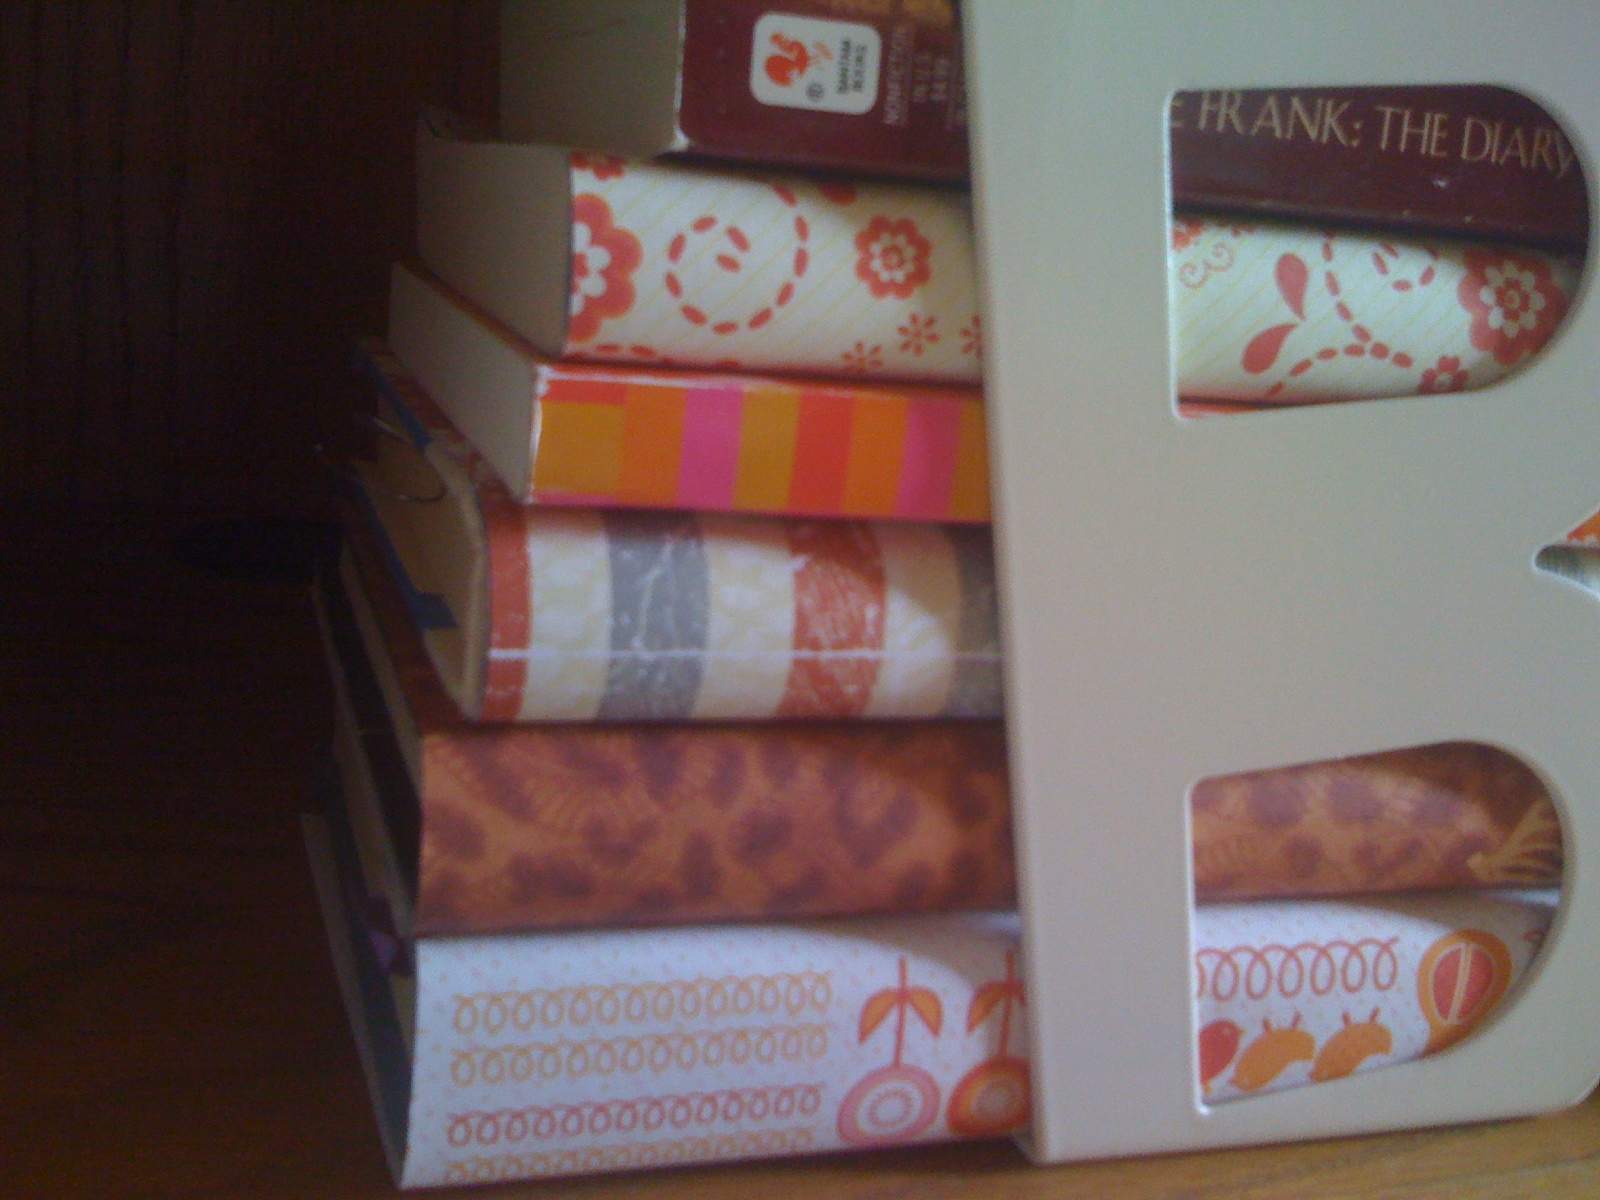
Gather: FUN scrapbook paper and at least 7 books of varying size
Cover the books with the scrapbook paper. Repeat. That's EASY!

For some books I was able to just take the paper to the cover. For others (antiques or paperbacks), I decided to fold over a leaf of paper inside the front and back covers.

To quickly keep the books straight, I wrote the titles just inside. See Gone with the Wind to the right.

Here's the "after" display:


Ta-DA! I love my new matchy-matchy books! 
How fun! I think the patterns are fun yet subtle and they complement the room and its colors.

Please also note my amazing IKEA purchase, a giant B bookend. I love Ikea

Try it yourself! Use your own paper and creative book arrangement. Enjoy!


Monday, March 26, 2012

Yard Work, Shmard Work

Colorado tends to be a bit behind Kansas in the changing of seasons, probably because of that dry Western air. In fact, during the fall time, I would try to pick out one weekend to go home from college after the leaves had turned in Kansas just so I could see them do the same in Colorado, the window was small but my Sophomore year, I hit it perfectly! It was enrapturing.

As Nick and I returned from our Spring break adventure to Colorado, we felt like we had stepped from the mountainous frigid air into a lush spring garden, just a state away. Everyone's lawns in Clay Center were green and freshly mowed, garden beds were inundated with new buds and blossoms, just teeming with life! We stared out the windows of the car in amazement.

And then we pulled up to our house.... EW! We realized just how much work needed to be done! Though the air was humid and buzzing with spring insects and birds,  our house seemed to be a few steps behind. It seemed saggy, lonely, bedraggled. Leaves scattered our patchy yellowed grass and the bushes surrounding our house ran wild. No flowers bloomed at the Brown's house.

Something  HAD to be done about this. SO yesterday we all packed up into Nick's truck and we went yard/lawn shopping at Menard's!

Then today, we put it all to practice. First, Nick raked the leaves. 28 bagfuls. And the problem STILL wasn't taken care of! We just ran out bags....


Then, he mowed the yard and replanted grass where it should have been all along. He also completely swept the front and back porches (my hero!) and watered all the new plantlife. Yay Nick!


My job was the cosmetics, i.e. the flowers. We had bought pansies, violas, rose bushes, rudbekias, hosta plants wildflowers, etc. and now I had to decide where to put them. And I discovered that potting soil is not my friend at all! But here's how it turned out:


Hopefully the pansies to the left perk up a bit after some tender loving care!


 Thanks to the Goodwill, I got this gorgeous green pot dirt cheap, and filled it with some hydrangeas (maybe that's what those pink things are called??) and purple/yellow pansies.

OOOOOooooooooooooooooooooooooooh!!!!!!!!!!!
And of course this amazing six-plant pot, courtesy of my aunt as a wedding gift from Ten Thousand Villages (I LOVE this place!) is filled with violas that are already starting to look a little less sickly (which was my ultimate goal).

Please ignore the color of our house, as it is subject to spontaneous change at any moment.


I love the tulips, but alas I cannot take credit for them. I didn't plant them- they just seem to grow like weeds around our cement. We intend on digging up the bulbs to relocate them.


Hopefully I have inherited my grandma Orange's green thumb. She is an amazing gardener and I would love to (someday) acquire that status, although, as we can see, that is going to take a lot of work and even MORE faith!!!!

This is the big picture:


Still nothing to be too amazed about, but the house has come such a long way! And, yes, I may have chosen to paint our front door orange, and it may have turned out brighter than anticipated.... and we may be embracing it!!!!!!!!!!!!!!!!!!!!!!!


I think it is my mission in life to convince EVERYONE that orange is the best color ever!


Monday, February 13, 2012

DIY Canvas Art

The story goes like this: our loyal but clueless beagle chewed up my antique version of Huckleberry Finn, which is devastating to an English major who enjoys collecting things! I decided I needed a way to salvage the pages at least!

My poor book! :(
Using my faithful Mod Podge, I plastered select pages (ones in good conditions and preferably lacking the profanity that can generally be found in Mark Twain's novels) in several directions on a small canvas (bought from Hobby Lobby, 2 for $3.50!)

At the top of the picture you can see the canvas covered in paper.


I then used a Sharpie (fine tip first, then a thicker one later to fill out the color) to create the shape of a tree. Using an image to copy is helpful here!


I created the bird out of felt and fabric- sketch it first! That might sound obvious but I'd be lying if I said I didn't try to wing it first... In placing the bird on the canvas, I'll be real when I say I tried to place it over the area where my tree looked more like a blob and less like a tree.... Simply using hot glue, I adhered the bird strategically!


After adding some font (hope) to the bottom corner since I sort of thought it looked blank, I think it may be finished-- but I might add a Bible verse. Not sure yet.

The finished product :)

Since this is kind of colorful, I will probably end up using it in the baby's room! I first saw this idea on Pinterest and modified it for my own personal taste.