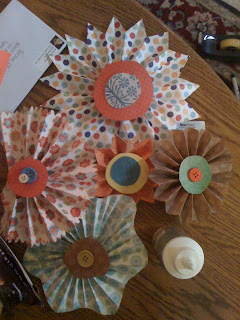
This project took me a few days last week to complete. It started out really frustrating for me, but I like the way it has turned out! These scrapbook paper wallflowers were the perfect springtime addition to our dining room!
1. Choose! To make these flowers, pick out some of your scrapbook paper in several different coordinating patterns. Decide beforehand which ones you want to use for the center of the flowers, the petals, and other accents.
2. Cut! In order to form the petals, your scrapbook paper needs to be at east 20" long (the longer the easier- trust me!), but mine wasn't, so I had to use tacky glue to adhere two pieces together. The widths of the paper will vary depending on the size you want your flowers, anywhere from 2.75" to 5 or 6." In the picture above, the small orange flower is the 2.75" width and the large polka dot flower is has a 5.5" width, with the others varying in between.

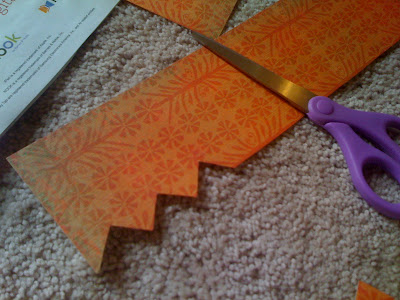
Left: Score the edge of one length in whatever fashion you want: the small orange flower is demonstrated below, a basic repeated triangular score. Other types include a more jagged, thin triangular score, small slits, or even wavy lines (as seen on the blue/green flower in the large picture above).

3. Fold! Accordion fold the paper in relation to the score- marks on the edges, as seen to the right. I made the mistake with this flower (my first) of making the folds too large, so smaller folds, though more difficult, will also be more beneficial. Be sure that your folds remain aligned with one another.

4. Bond! Glue the edges of the folded paper together to form a tube. When the glue is secure and dry, gently push down on the un-scored edge of the tube until it flattens. Mine were never able to fully flatten, so gluing the back was difficult- I used hot glue for this part since it hardens quickly and holds paper well. Then I simply cut out two circles of coordinating paper for the center. You can use other items to be creative as well: buttons, fabric, beads, pearls, bling, anything!
5. Repeat! Use an appealing variety of colors, patterns, solids and shapes!
6. Show off! Hang your masterpiece somewhere it'll POP! To connect them, I used hot glue and balsa wood to create a stable foundation for all the flowers. To hang them, I (shamefully) used tape! But it worked, so I guess I'll just call it "using my immediate resources" instead of "being straightup tacky."
Hope you enjoy this project as much as I did!


No comments:
Post a Comment